
Today I am sharing with you all the blog I wrote a couple of years ago, but it is very apt for today. My village changes little, and yet I find something new in it everyday , I think we are all looking at the small changes we see everyday and rejoicing in them. It is right to acknowledge how tough things are just now, everyone has their own experience and each one is different and valid. I take a lot from my daily walk , which treads the same path everyday and yet somehow manages to offer something different.

So for all I have lost I have gained the joy of really looking, and seeing, and feeling the sunshine....for that is a gift

After lots and lots of rain Devon has been blessed with some sunshine recently and suddenly everything has burst into life. The trees are beginning to bud, the hedgerows are bursting with flowers , young green shoots are everywhere , the bees, and birds are all around. I am lucky to be surrounded by all this green and have decided to share with you my step by step painting of the lane that snakes out of our village. I love the bend in the road as it makes you wonder what lies ahead.

So this is my photo of what I am going to paint. I take a close look as I don't want to paint every blade of grass or every branch. I am in control and can add or take away as I please.
1. I sketch out what I am going to do

2. I want to paint from light to dark, so I first very quickly paint in a quick sky with cerulean blue and lots of water

2. Next I paint in the background bank with light spring greens and yellows.

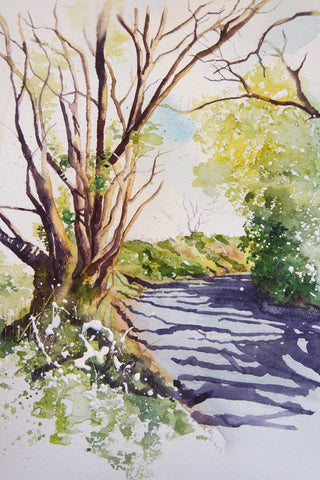
3.Next I paint the right hand trees and vegetation on the right, paying attention to the lights and darks, and I paint the lightest colour of the lane. here is where I use artistic license , I use a mixture of cobalt blue and brown but a very weak wash. Things are getting filled in.

4. Now I can begin to work on the focal point of painting. The tangle of tree on the left hand side. I use yellow ochre for all the branches but while they are wet I drop in a mixture of cobalt blue and cad.red which is my 'go to' shadow colour on the left of all the branches. I also want the tree to grow from the vegetation so I wet and paint the tree coming out of the undergrowth

5. Now by adding a darker mixture of cobalt blue and cadmium red I can add more shadow. By darker I mean more concentrated, so less water in the mix. Therefore more contrast. Really making the tree the star of the show and showing those deep bright shadows we get on sunny ,late spring days.

6.All that is left to do now is add the shadows on the road and under the tree. I really want to make the tree 'pop' and lead your eye into the painting. Make sure you mix enough colour to get it done in one go and go for it.If you are worried maybe practice first on a separate paper, same colours as before cadmium red and cobalt blue. I also add some splatters and splashes ( just because I like the looseness of them ) and you don't get them in a photograph.
I hope you enjoy these step by step blogs, and feel inspired to have a go yourself, since painting this piece I have added some primroses to the foreground I do come back to paintings, I stand them up in my studio for a while and see if there'd a flaw I have missed or an improvement I can make.

Enjoy the Spring sunshine if you can , I do hope that wherever you live there is somewhere you can go that inspires you and really makes you look x
Finally a little plug, I keep my blogs free to anyone who may find them helpful, but in order to make a living I do have to sell my work, in the form of cards, prints, books and originals, so if you like what I do do have a look in my shop, perhaps something will catch your eye, or inspire you to keep painting . Thanks for all your support