
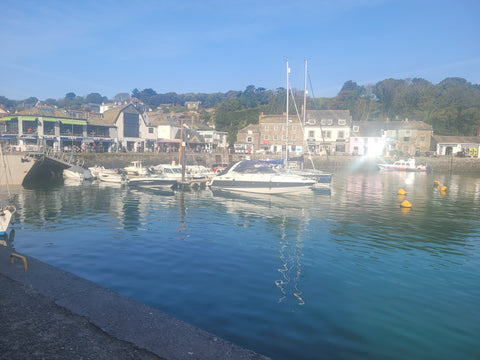
We went away at the weekend we were so very lucky with the weather , Padstow looked glorious in the sunshine.
It felt a world away

from what was going on in the Middle East, oh my goodness, I have no words to add, just my empathy for anyone and everyone caught up in the violence there.
It seems co insignificant carrying on with painting pictures at the moment, but it is what I do, I hope a few hours painting is something people can do, an act of self protection and mindfulness that takes us all away from the world for an hour or two.
Now bear with me , I have just discovered voice dictation on my laptop, so I used it to make this blog, so if some of the sentences seem very short ( it's because it kept putting in full stops) , and if some of it doesn't make sense , then blame a computer that perhaps hasn't tried watercolours yet !
Let me know how it goes
First, make sure your drawings accurate. I spend a long time making sure that I've got everything in the right place. If not, the finished painting won’t work.

Now I want to spray the paper. I use a little water spray bottle that you can get from chemists.

I spray around the painting where I want the watercolour to flood the page. Don't be shy, spray lots of water, we want the colours to be nice and autumnal, so I'm going to use yellows and reds like you find in the Goldfinch. And of course, the colours you find in autumn leaves at this time of year.

I'm using some Indian Yellow, so I wet my brush. Then I make a puddle with the paint, and I use that colour to tap it all around the bird, where I want the colour to be on the paper. I might use a reddy brown, like burnt Sienna. So, some of that can go around the leaves as well. Oranges, yellows, and Reds are whta I'm after. Always make sure you got some kitchen roll on hand. Blot at any places you don't want the colour to be. Now you must let everything dry.

Everything is very wet. So, I can pull some of the colour up into the areas that I want it to be. Time for a cup of tea, I think, while it dries.
Now everything is DRY. I'm going to start on the bird’s eye I like to paint the eyes and the beak very detailed as I think these are really important. And then I like to get much more loose as the painting goes on. It's just something I like to do.
So for the eye I've got a very small brush. This is a 000 Series 7. Windsor and Newton brush. I've always got some kitchen roll on hand as well so that I can blot it, if it gets too wet. When you are painting eyes, you want to leave a tiny patch of clear paper to act as the light shining on the eye. I'm going to use yellow ochre, burnt umber and a touch of sepia. To make the black in the eye I mix sepia and indigo. You need a steady hand and a small brush to paint eyes.

Now I'm going to do the beak. Which is a sort of pinky yellow colour. So I want to use some cadmium red and a touch of yellow ochre. I'm using the same brush that I used for the eye. The middle of the beak. I'm going to let the white of the paper come through. There is also a touch, a tiny touch of cerulean blue. The darkest bit is the middle. Slight shadow under the peak. Keep looking and altering, changing things as you go.
I'm going to use a slightly bigger brush now the goldfinch has a sort of mask of red around the head That's what makes them such pretty birds. We don't have many birds in this country that are colourful, which is why I think we like kingfishers and Robins as well as goldfinches. To make it look feathery, I paint beyond the line. You get a soft edge which looks like feathers. You want the nice, brightest red you can get? Maybe Cadmium Red Light. I'm just going to drop the colour in. Where we want the light to hit it. Indian Yellow. There is something delicious about painting in red.

Now I'm going to add the dark bits onto the red, but I don't want to do it in black. Mix red and cobalt blue to get a Purpley colour. You can always make things darker. But you can't make them lighter. So go steady. There are little dark areas under the beak and it's these little details that will make your birds sing. But I never ever use black. I'm going to reinstate some of the red as well. Just so it's nice and bright.
Now I'm working my way down the bird, wetting his head again, we want the top of his head, which is a black colour. I'm going to use Paynes Grey and tiny touches of cerulean blue. So first I under paint where it's going to be black in the cerulean blue. Good. Now with nice thick paynes grey letting some of the blue shine through, that’s the birds head done. .
. So as we get into bigger spaces, we can use bigger brushes. But when I say bigger, I don't mean that big. So we're looking at that size 2 or 3 maybe? I am going to paint all the back of the bird. Paint it all in water.
When I paint with water
1-it's giving me a base that the paint is going to go into.
2-. It's a sort of practise. For the bit that's going to come next.

I am painting the whole back section together, but I'm going to paint that yellow splash first . I’ll use that lovely Indian yellow again. And it doesn't matter if it goes over the area you want it to because. The darker colours are going to go around it.
When you're using light colours like yellow. Make sure you brush is a really clean. You don't wanna get any black or blues or greens in there. You want the yellow to sing. Tiny touch on the other side too so that is all yellow. The next back colour is brown. So, I'm using a burnt umber. I'm bringing the paint around the bottom and down towards his foot. And I've gone over the bits that are going to be black because I can add more detail when I get to it.
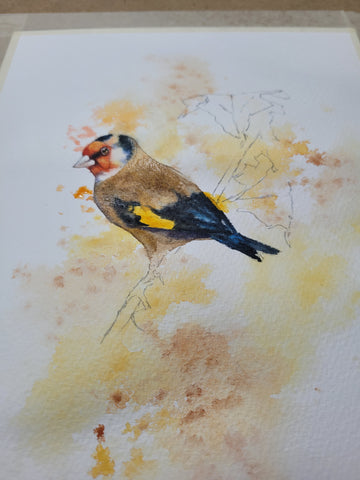
This is all about controlling the amount of water. for the black feathers I'm going to use paynes grey. I want to go in while the brown is still a bit wet. Then the paints can merge. Use paint, which is a slightly thicker consistency it should stay put better. I'm not going to worry about the white patches because I'm going to cheat. If you're a pure watercolorist you’ll have to paint around those white patches. I'm also gonna put a touch of cerulean in blue on the wings because that shows the shine on them. But at this point, you want your brush to dance around. Try not to be too specific. You are describing the wings with your paint.

Now we need to add some shadow. I'm going to use cobalt blue and cadmium red. the brown is still quite wet so I will add the shadow underneath and also the edge of the wing casts a shadow.
I want to hint at the branch the bird is perching on, I just paint it in water. then I'm going to paint with yellow ochre and then I'm going to add Burnt umber to give the branch some definition.

Finally, to finish off our autumn painting. I want to paint the leaves. These look like oak leaves. I turn my painting upside down.

I'm going to start with this top leaf in yellow, ochre all over then I’ll add some. burnt Sienna. Dropping it into the yellow ochre. Creating highlights, where I let the yellow ochre shine through. Then some burnt umber, to make an even darker brown. You can put the veins of the leaves in. You can darken some edges. This leaf is curled over, which makes it quite attractive. So you want to paint the shadow the darker side of the leaf in a really dark brown so it can add some sepia to my burnt Sienna. See what that looks like. I did the other leaf in pretty much the same way.

Finally to do the white parts of the wings. I'm going to cheat and use some white acrylic. Add the white acrylic. With a small brush. Then just to finish it off I added some black splatters with paynes grey.

There he is done, please forget about everything else for a while and have a go x